How many of you have picked up the little pack of English paper pieced hexies at the Marshfield quilt show? They always have a stack of them sitting on the "free" table and they must be provided by the Blank Textile Co. The hexies are so pretty and irresistible and I put them in my purse and then add them to the stack back in my sewing room. This winter I actually hand sewed them together and decided to make a project which featured them.
This is the first needle book that I assembled with the hexagons on the front. It was around Valentine's Day and I couldn't resist the red fabric. If you click on each picture, it will enlarge so you can see better.
Inside, I pieced the lining of the book and used leftover batting as my "pages".
So after this needle book I made a couple more and took photos of the steps. I think you'll be able to make a needle book from this.
If you are using the hexies, assemble them. If you don't have the Blank Textile hexie packs, the measurements of the hexies are .75" on each side or 1.5" across the hexagon. Assemble into a flower.
I started by cutting (1) outside and (1) inside piece of fabric, each 12" x 6.5". I am making two books at the same time.
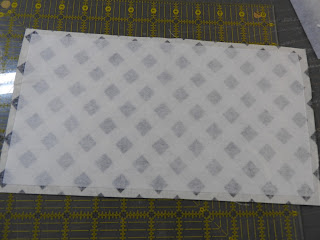
Then I cut a piece of interfacing slightly smaller all around than the inside piece of fabric. I cut it just about a 1/4" smaller on all sides so I wouldn't sew it into my seam allowance and not add bulk to that seam. This interfacing was what I had on hand; it was 809 Decor Bond which is a firm fusible interfacing so you can use something similar to add some firmness to your book. I then centered it on the back of my inside piece of fabric .and fused it.
I then took the outside pieces and folded in half and pressed the center crease. This lets me visualize where to put my hexie flower on the front. Arrange your flower or if you want another applique, do it now. Stitch to the right side of the fold line. Leave enough room for a button near the edge for fastening your book shut.
Take a chalk marker and mark the center of your inside fabric.
My first needle book did not have a scissor holder but I wanted it on the other two. I decided to put it on the inside of the back page. I measured my scissors and then added some to it. My measurements to cut the fabric were 4.5" x 3". Cut fabric.
Then press one narrow end 1/4" fold and then fold over again and press to make your hem. Do not sew it yet. Measure 1/2" from each side on the opposite end of your scissor holder and make a pencil mark. We are going to shape your scissor holder.
Unfold (1) of your folds on the pressed end. Line up ruler with the edge of fold and with your pencil mark on opposite end. Cut each side in this manner. This gives you a nice shape for your scissor holder.
This is what it should look like. Now you will iron the sides. Leave that one fold up at this point and iron your sides and then iron the bottom. Now fold your top over again and press. You might have to fiddle with sides a bit to make the top fold look nice and then press again.
It should look similar to this.
Sew the hem of the scissor holder now.
Position the holder on the inside fabric of your needle book. Sew in your desired position on the inside fabric. Be aware of your center chalk line as you don't want it there. Use a narrow seam.
Lay your outside fabric on a scrap of cotton or cotton blend batting and cut the same size as your fabric. Keep your fabric face up on the batting.
In the photo above, I am putting in the closures for the book. These are hair elastics and if you don't have these, a thin elastic should work too. Position them on the inside fabric, make sure you chose the correct end of the fabric and then baste in place by machine. Cut off the extra. Lay your pieces as below.
This is the order of the layers.
Using an approximately 3/8" seam, sew all around the piece, leaving an opening to turn, about 3" should do it.
Clip corners and then clip the batting from the turning area. I find this clipping helps when you hem the opening shut. Turn right side out and gently press. Use a ladder stitch or stitch you like to close the opening.
Now is the time to plan your pages for your needle book. You can use cotton batting, I like the 100% cotton for this or felt is really nice to put needles in.
You can cut them the size you like, I did about 10" x 5". I cut two pieces. I used a pinking blade but that's not necessary. Lay them on your book. Do you like the size? If not, cut a bit off and adjust. Once you have the right size, find the middle. I then sewed down the middle to hold both in place. Lay the pages on the inside of your book and find it's middle and pin.
Sew through the book cover and all pages. Decorate your pages as you wish but leave room for needles and pins! Hot glue works great to attache decorations and you can sew through paper that you've drawn or written on. Add a pretty button to the front for your loop and you're done.
These are so useful and make great gifts. I'm going to put some away to start my Christmas present stash. The only thing I regret is that this project didn't use up more scraps. I hope you like my needle books and try them for yourself. This is the Mystery Question for the March meeting. What pleasing shape did my tutorial for the needle book start with? The answer of course is a hexagon.
As an update to the quilt show information, I have put the quilt entry form online under the Quilt Show Information page. You should be able to submit it to me via the internet.
Diana


 Then I cut a piece of interfacing slightly smaller all around than the inside piece of fabric. I cut it just about a 1/4" smaller on all sides so I wouldn't sew it into my seam allowance and not add bulk to that seam. This interfacing was what I had on hand; it was 809 Decor Bond which is a firm fusible interfacing so you can use something similar to add some firmness to your book. I then centered it on the back of my inside piece of fabric .and fused it.


